Overview
Use this journey when you hire someone new or need to add an existing staff member to the system. The employee form collects personal details, employment information, and optional system account credentials. Once created, you can assign services to the employee from their profile page so they appear as bookable providers during appointment scheduling.
Prerequisites
- Role required: Admin or Manager (create and edit); all staff can view employee profiles
- Before you start: Have the employee's name, position, hire date, and employment type ready. If you are creating a login account for them, decide on a username and temporary password.
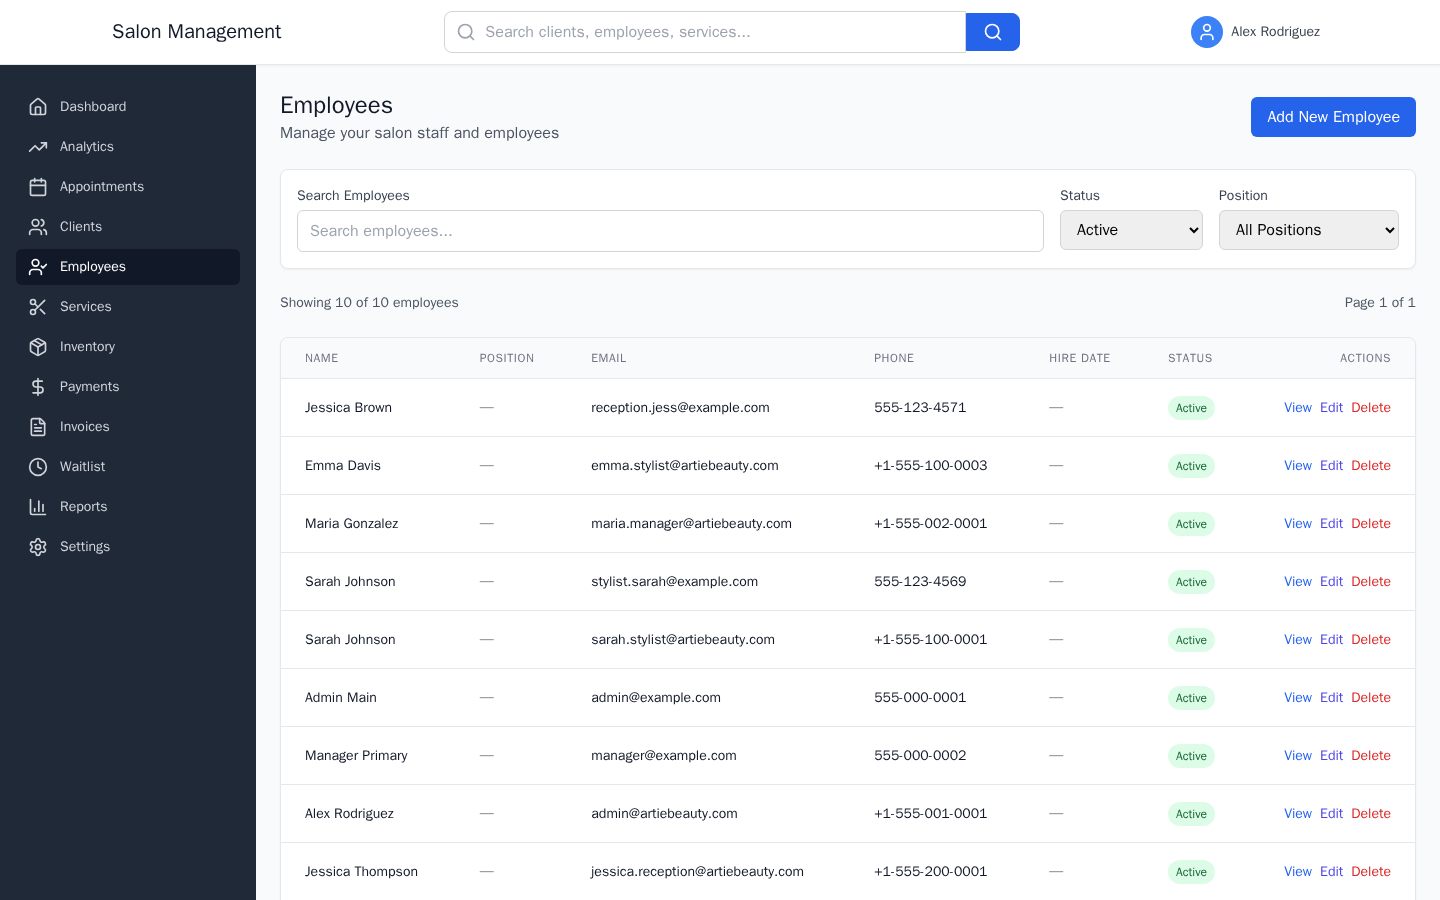
Open the Employees List
Click Employees in the sidebar navigation, or go to /employees directly.
What you'll see: The "Employees" list page with the heading "Manage your salon staff and employees." The table shows all current employees with columns for Name, Position, Email, Phone, Hire Date, and Status (Active / Inactive). You can sort any column by clicking its header, filter by position using the "Position" dropdown, and search by name or email using the search bar.
Start a New Employee Record
Click the Add New Employee button in the top right of the list page.
What you'll see: You are taken to /employees/new, which is the employee form page titled "Employee." The form is divided into five sections.
Configure the User Account Section (Optional)
The first section is User Account: "Optionally create or link a login account for this employee."
Use the User Account dropdown to choose one of three modes:
| Option | When to Use |
|---|---|
| No user account | The employee does not need to log in (e.g., payroll-only record) |
| Create new account | Set up a fresh login for the employee |
| Link existing account | The employee already has a system account; connect it by email |
If you select "Create new account", three additional fields appear:
- Username (required) — at least 3 characters
- Password (required) — at least 8 characters
- Confirm Password (required) — must match the password field
- System Role (required) — determines what the employee can access; options are Employee, Receptionist, Manager, or Admin
If you select "Link existing account", one additional field appears:
- User Email to Link (required) — the email address of the existing user account to connect
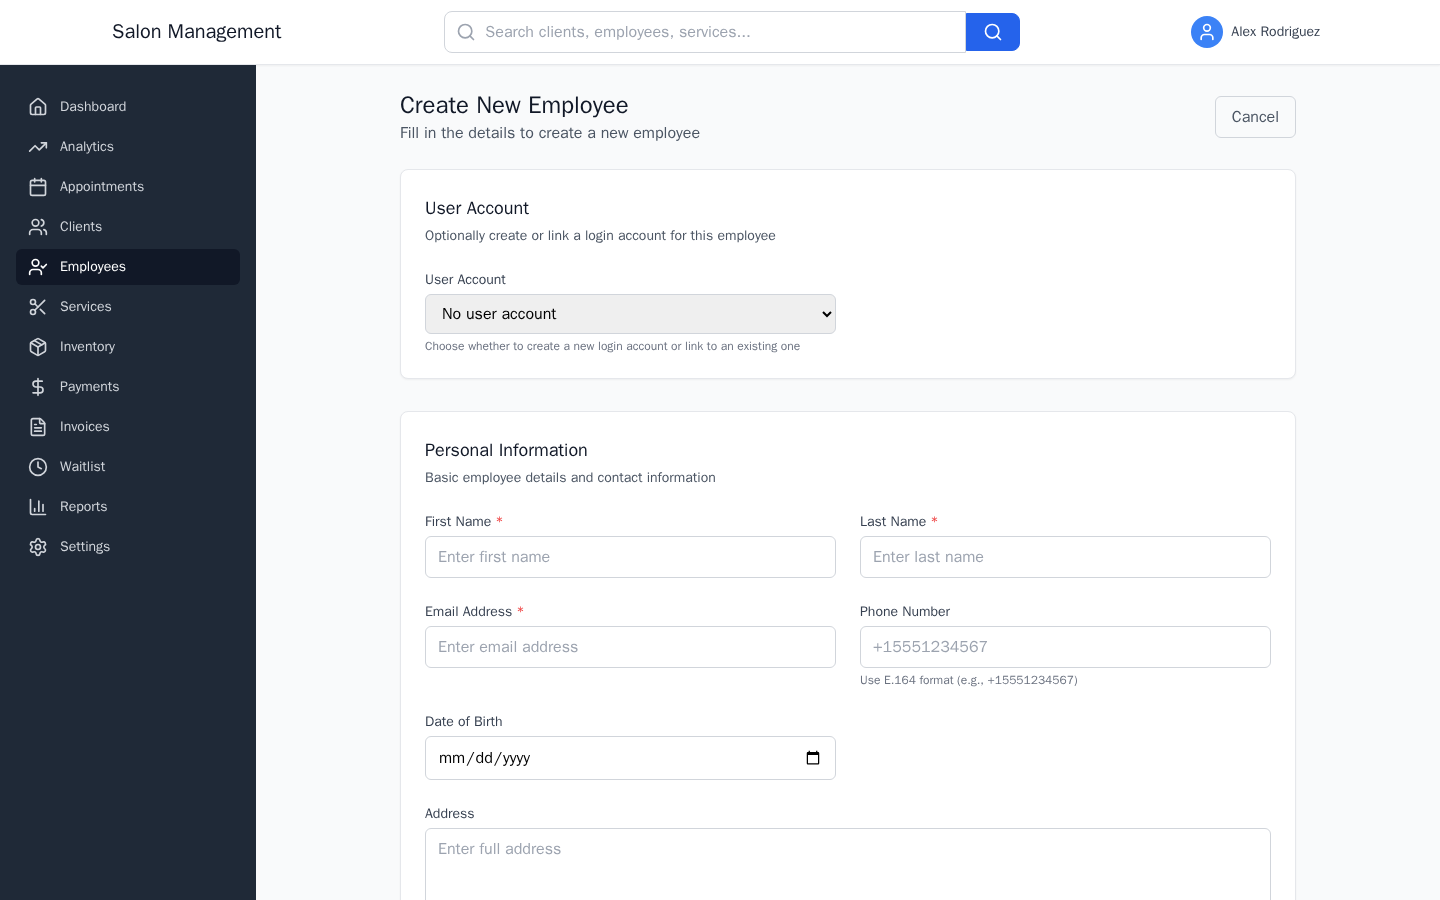
Fill in Personal Information
The second section is Personal Information: "Basic employee details and contact information."
| Field | Required | Notes |
|---|---|---|
| First Name | Yes | 2–50 characters |
| Last Name | Yes | 2–50 characters |
| Email Address | Yes (if creating an account) | Standard email format |
| Phone Number | No | Use E.164 format, e.g., +15551234567 |
| Date of Birth | No | Employee must be between 16 and 100 years old |
| Address | No | Full mailing address |
Fill in Employment Details
The third section is Employment Details: "Position, schedule, and employment information."
| Field | Required | Notes |
|---|---|---|
| Position | Yes | Select from: Hair Stylist, Hair Colorist, Barber, Nail Technician, Esthetician, Massage Therapist, Manager, Receptionist, Assistant, Other |
| Hire Date | Yes | Cannot be in the future |
| Hourly Rate ($) | No | 0–200 |
| Commission Rate (%) | No | 0–100 |
| Employment Type | Yes | Full Time, Part Time, Contract, or Temporary |
| Active Employee | No (defaults to checked) | Uncheck to create the record as inactive; inactive employees do not appear in scheduling |
Fill in Skills & Specializations
The fourth section is Skills & Specializations: "Services and specialties this employee can perform."
| Field | Notes |
|---|---|
| Specializations | Free text; separate multiple items with commas (e.g., "Balayage, Color Correction, Bridal Styling") |
| Certifications | Free text; include certification name, issuing organization, and expiration date |
| Years of Experience | Number between 0 and 50 |
Fill in Additional Information
The fifth section is Additional Information: "Emergency contact and notes."
| Field | Notes |
|---|---|
| Emergency Contact Name | Name of person to contact in an emergency |
| Emergency Contact Phone | Use E.164 format, e.g., +15551234567 |
| Notes | Internal notes not visible to the employee |
Save the Employee Record
Click the Save button (or Create Employee depending on the form state) at the bottom of the form.
What you'll see: If the form has validation errors, each field with a problem displays an inline error message in red (e.g., "First name is required", "Passwords do not match"). Fix the errors and click Save again.
On success, the system redirects you to the employee list at /employees, where the new employee appears in the table.
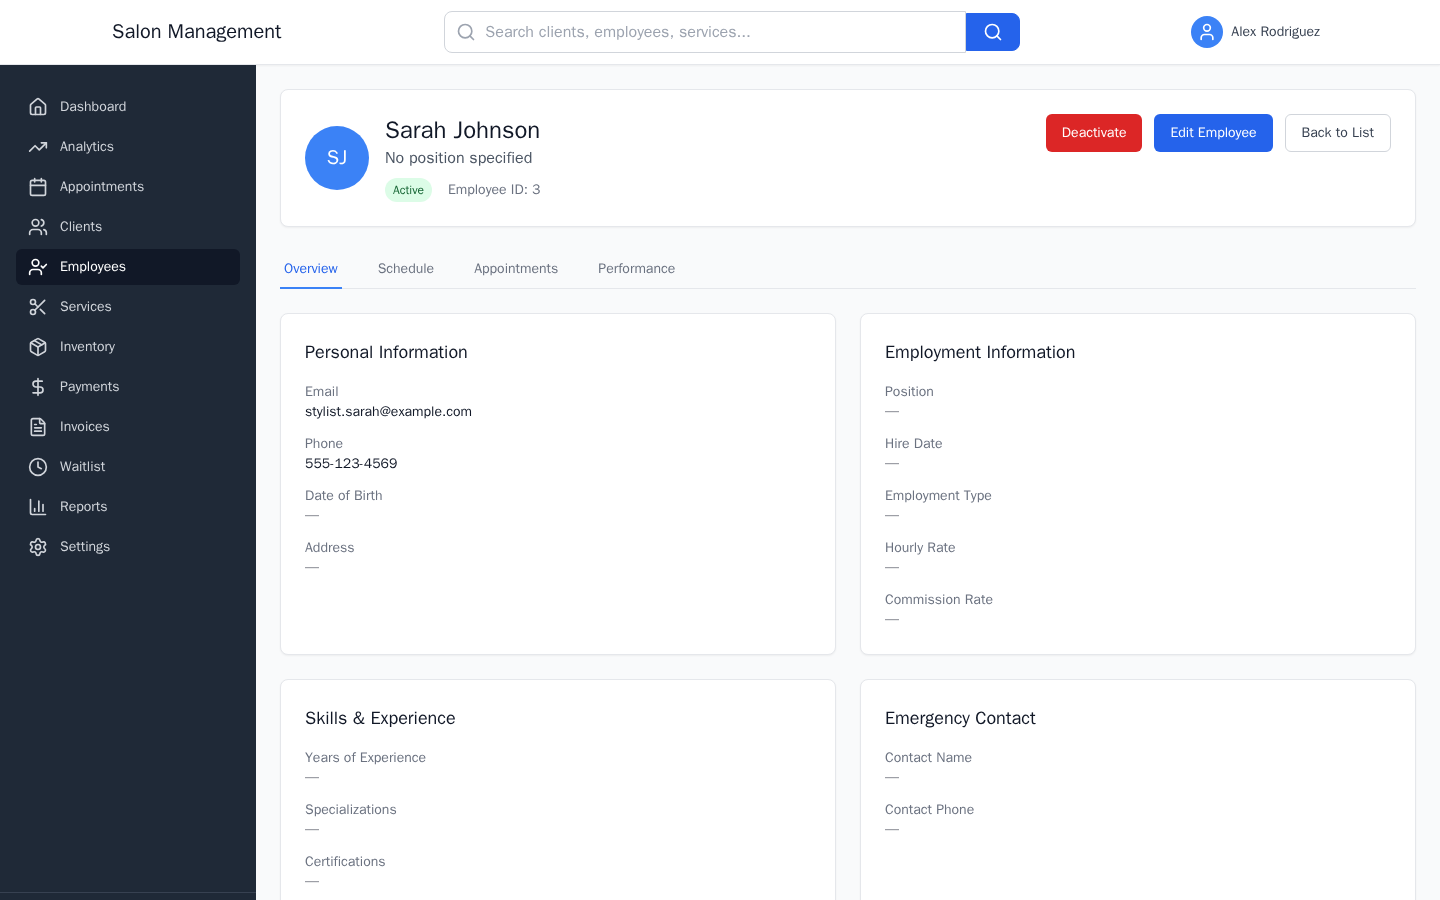
View the Employee's Profile
Click the employee's name or the view icon in the list to open their profile at /employees/:id.
What you'll see: A profile header showing the employee's initials, full name, position, active/inactive badge, and Employee ID. Four tabs are available:
- Overview — panels for Personal Information, Employment Information, Skills & Experience, Emergency Contact, and Notes
- Schedule — manage the employee's weekly availability and working hours
- Appointments — appointment history (feature in development)
- Performance — performance metrics (feature in development)
You can click Edit Employee (top right of the profile) to modify any fields, or Deactivate / Activate to toggle their active status without deleting the record.
Assign Services to the Employee (Optional)
After creating the employee, assign the services they are qualified to perform so they appear as available providers during booking.
Navigate to the employee's profile page and look for the Services assignment functionality. Check the services this employee can perform and set the appropriate skill level for each service. Service assignments control which appointments can be booked with this employee.
Tips & Best Practices
Common Issues
| Issue | Solution |
|---|---|
| "Username must be at least 3 characters" | Enter a longer username; single-character names are not allowed |
| "Passwords do not match" | Re-enter both password fields; they must be identical |
| "Email is required when creating a user account" | When "Create new account" is selected, the Email Address field in Personal Information becomes required |
| "Hire date cannot be in the future" | Set the hire date to today or an earlier date |
| "Use E.164 format" on phone field | Include the country code with a + prefix, e.g., +15551234567 for a US number |
| Employee does not appear in scheduling | Check that the "Active Employee" checkbox is enabled on their profile, and that services have been assigned to them |
Related Journeys
- Daily Dashboard Walkthrough — Employee performance data feeds into the Leaderboard and ROVI Metrics on the dashboard
- Running Reports & Exporting Data — Employee performance metrics appear in the Reports section once the employee has completed appointments