Overview
This journey covers two related areas of salon operations: maintaining your service catalog and managing physical product inventory. You'll use the Services section to define what your salon offers and at what price, and the Inventory section to track product stock levels, reorder points, and transaction history. Both areas feed into bookings and sales throughout the rest of the system.
Prerequisites
- Role required:
- Services: Admin or Manager to create and edit; all staff roles can view
- Inventory: Admin to create and delete; Manager to update; all staff roles can view
- Before you start: Have your service pricing, durations, and product SKUs ready
Navigate to Services
Click Services in the main navigation. You'll land on the Services list page (/services).
What you'll see: A table with one row per service, showing:
| Column | Description |
|---|---|
| Service Name | Service name with service type shown below it in gray |
| Price | Base price formatted as currency (e.g., $75.00) |
| Duration | Duration displayed as hours and minutes (e.g., 1h 30m or 45m) |
| Description | Truncated text; hover to see the full description |
| Consultation | Badge showing "Required" (yellow) or "Optional" (gray) |
| Status | Badge showing "Active" (green) or "Inactive" (red) |
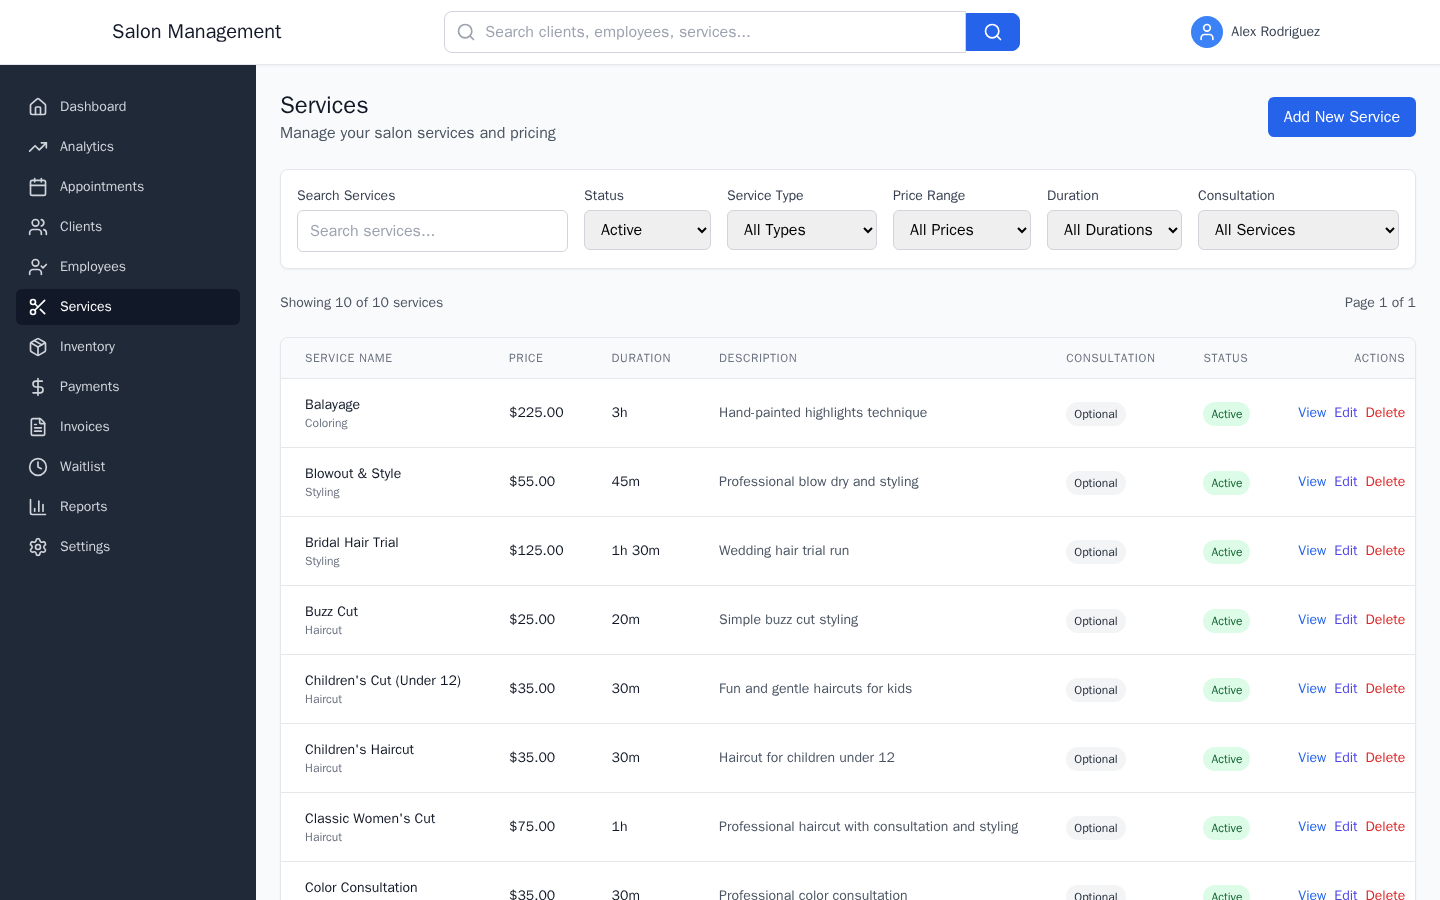
Filter the List
Use the filter controls above the table to narrow results:
- Service Type — Filter by category: Hair Cut, Hair Color, Hair Styling, Hair Treatment, Nail Service, Facial, Massage, Waxing, Makeup, or Consultation
- Price Range — Filter by price bracket ($0-$50, $51-$100, $101-$200, $201-$500, $501+)
- Duration — Filter by time bracket (0-30 min, 31-60 min, 1-2 hours, 2-4 hours, 4+ hours)
- Consultation — Filter by whether consultation is required or optional
Use the search bar to find services by name.
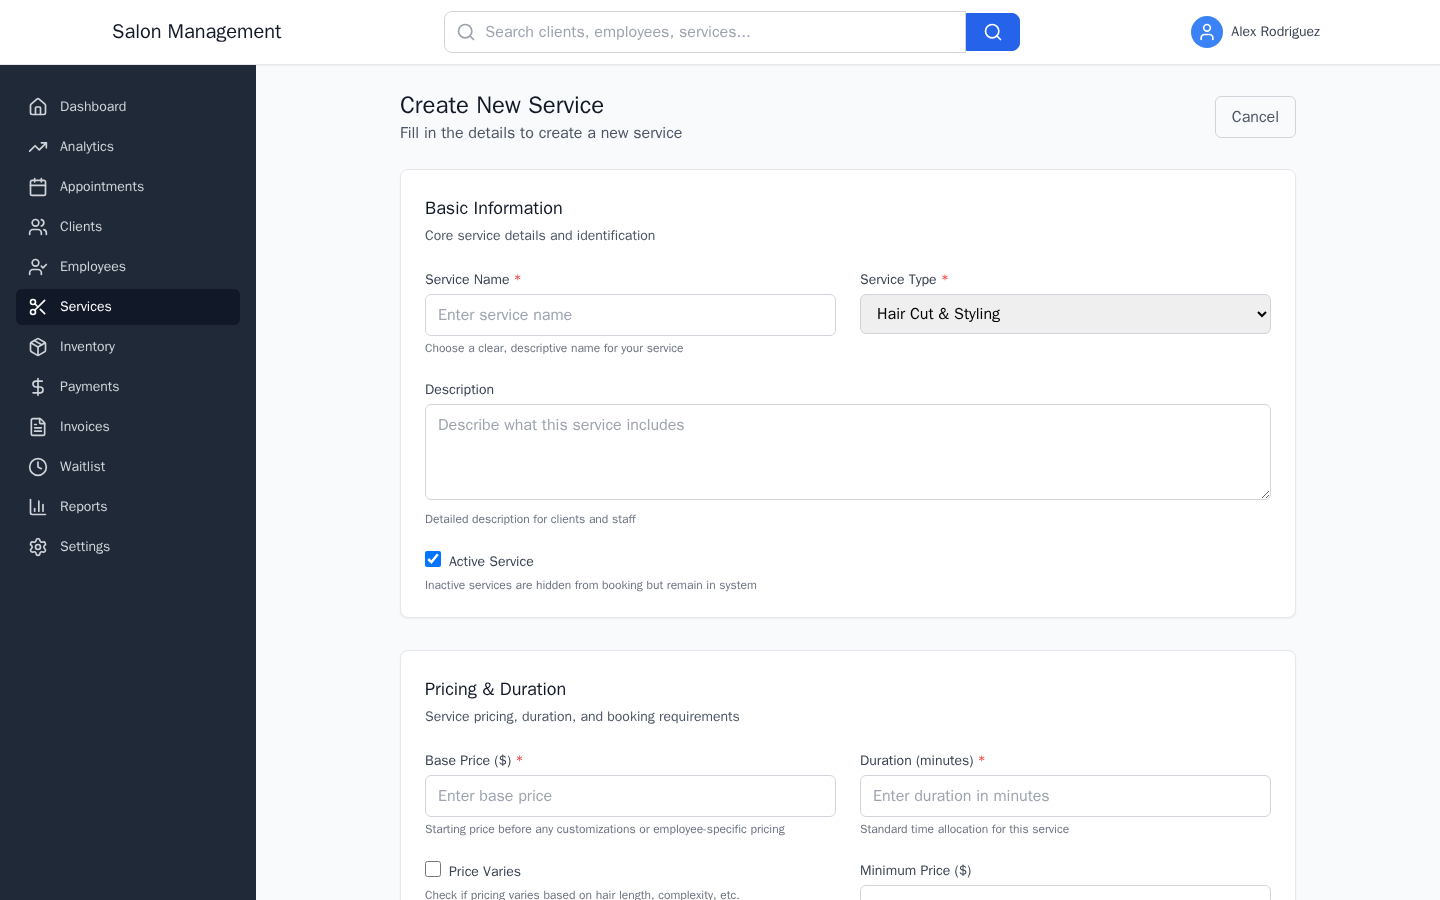
Add a New Service
Click the Add Service button (top right). You'll be taken to the service form at /services/new.
The form has three sections:
Basic Information
- Service Name (required) — Clear, descriptive name. 2-100 characters.
- Service Type (required) — Select from: Hair Cut & Styling, Hair Coloring, Hair Treatment, Nail Services, Facial & Skincare, Massage Therapy, Waxing & Hair Removal, Makeup & Beauty, Consultation, Package Deal
- Description — Optional. Full description visible to staff.
- Active Service — Checked by default. Uncheck to hide the service from booking without deleting it.
Pricing & Duration
- Base Price ($) (required) — Starting price, $0–$5,000
- Duration (minutes) (required) — Standard time for this service, 5–480 minutes
- Price Varies — Check this if pricing depends on hair length, complexity, or other factors
- Minimum Price ($) — Required when "Price Varies" is checked
- Maximum Price ($) — Required when "Price Varies" is checked
- Requires Consultation — Check if the service requires a consultation appointment before booking
Scheduling Options
- Dual Booking Compatible — Allow this service to be booked alongside another service in the same time slot
Click Save to create the service.
View a Service
Click the View link on any row to open the service detail page at /services/:id. This shows the full service record including all fields.
Edit an Existing Service
From the list or detail page, click Edit. You'll be taken to /services/edit/:id with the same form pre-filled. Make your changes and click Save.
Deactivate a Service
If a service is no longer offered but you want to keep its history, edit the service and uncheck Active Service. Inactive services are hidden from booking but remain in the system for reporting purposes.
Navigate to Inventory
Click Inventory in the main navigation. You'll land on the Inventory list page (/inventory).
What you'll see: A table with one row per product, showing:
| Column | Width | Description |
|---|---|---|
| SKU | 100px | Stock Keeping Unit identifier |
| Product Name | — | Product name |
| Category | — | Category name, or "Uncategorized" |
| Stock | 80px | Current quantity, color-coded by stock health |
| Reorder | 80px | Reorder level threshold |
| Cost | 100px | Your cost per unit |
| Retail | 100px | Customer price per unit |
| Status | 80px | Active (green) or Inactive (gray) |
Stock color coding:
- Red — Out of stock or at/below the reorder level
- Yellow — Low stock (quantity is at or below 1.5x the reorder level)
- Green — Stock is adequate
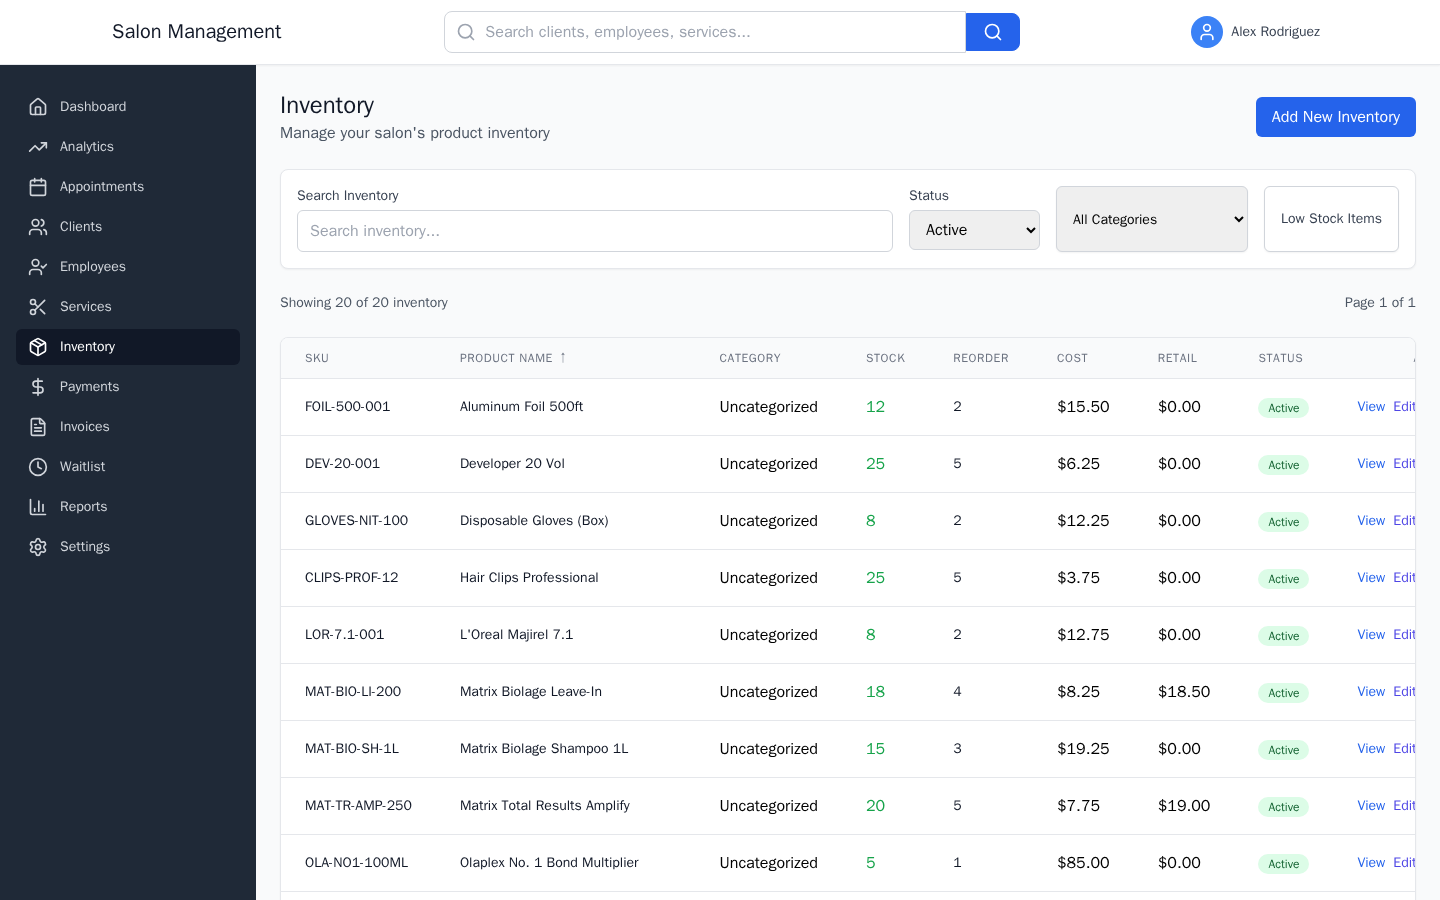
Filter the List
Use the All Categories dropdown to filter by product category. Click Low Stock Items to quickly see products that need restocking.
Add an Inventory Item
Click Add Inventory Item (top right). You'll be taken to /inventory/new.
The form has four sections:
Basic Information
- Product Name (required) — 2-100 characters
- SKU — Optional. Your unique identifier for this product (up to 50 characters)
- Description — Optional notes about the product
- Category — Select from available product categories (loaded dynamically)
Stock Information
- Current Stock (required) — Starting quantity on hand, minimum 0
- Reorder Level (required) — Alert threshold. Stock at or below this level shows red in the list.
Pricing
- Cost Price — What you pay per unit
- Retail Price — What you charge customers per unit
Status
- Active — Checked by default. Uncheck to hide from selection lists.
Click Save to create the item.

Adjust Stock
To record a stock change for an existing item:
- Find the item in the inventory list
- Click Adjust Stock on that item's row
- Enter the quantity change (positive to add, negative to remove)
- Select the transaction type:
- Purchase — Stock received from a supplier
- Sale — Stock sold to a client
- Adjustment — Manual correction (e.g., damage, count discrepancy)
- Waste — Product discarded (expired, spilled, etc.)
- Enter a reason or note for the adjustment
- Click Save
The new quantity appears immediately in the list, and the stock color updates based on the new level.
Monitor Low Stock
The dashboard displays low stock alerts for any product at or below its reorder level. Check the inventory list regularly or set up notification settings to be alerted before you run out.
Tips & Best Practices
Common Issues
| Issue | Solution |
|---|---|
| Service not appearing in booking flow | Check that "Active Service" is checked on the service edit page |
| Stock count is wrong | Use the Adjust Stock action with type "Adjustment" and a note explaining the discrepancy |
| Category not showing in dropdown | Product categories must be active. Check with an admin that the category is enabled via the API |
| Price Varies fields won't save | Both Minimum Price and Maximum Price are required when Price Varies is checked |
| Duration shows in hours incorrectly | Duration is stored in minutes. Enter 90 for 1h 30m — the list displays it as "1h 30m" automatically |
Related Journeys
- Booking an Appointment — Services appear in the booking flow once they are active
- Processing a Payment — Retail price drives point-of-sale product sales
- Running Reports & Exporting Data — Inventory and service performance appear in business reports